ToC
Alibaba Cloud CLI
私は、AWSだけでなく、Alibaba Cloudも利用しています。
AWSを利用する際にもAPIを学ぶためにCLIを見ながら確認をすすめることがあるのですが、
Alibaba Cloudでも同じようにAlibaba Cloud CLIが提供されているので、これを利用してみようと
思います。
インストール
公式サイトの手順に沿って、最新のCLIファイルをダウンロードします。
Macで実行した際は、CLIモジュールファイル(tar.gz形式)を解凍して、/usr/local/binの
ディレクトリに配置するだけの簡単な手順でした。
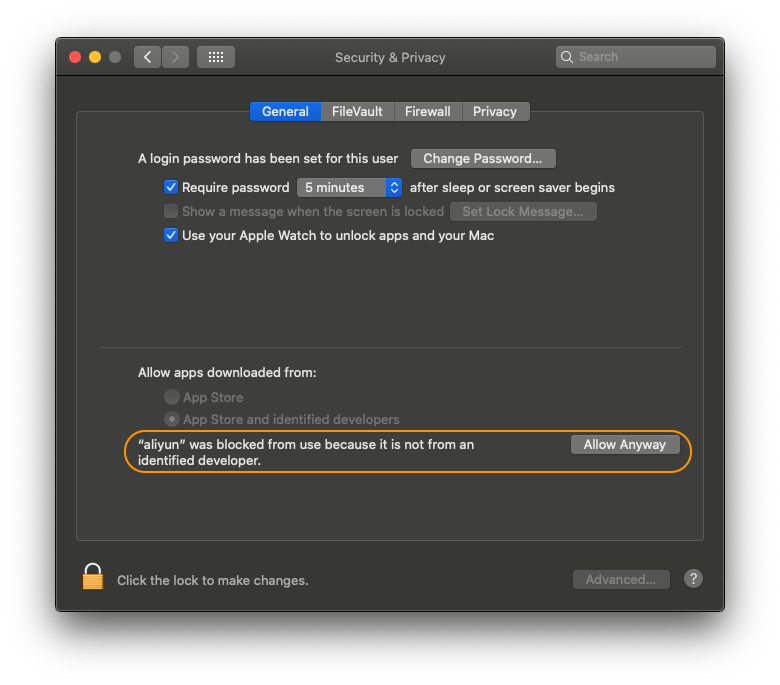
ただ、手順通りに実行しただけだとSecurity & Privacyの機能により
Developper cannot be verifiedとなり、はじめは実行できずにエラーとなると思います。
Security & Privacyの画面を開いて、許可することで実行が可能になります。
Terminalでaliyunコマンドを実行するとバージョン番号と利用方法が表示されました。
$ aliyun
Alibaba Cloud Command Line Interface Version 3.0.56

Usage:
  aliyun <product> <operation> [--parameter1 value1 --parameter2 value2 ...]

Commands:
  configure       configure credential and settings
  oss             Object Storage Service
  auto-completion enable auto completion

Flags:
  --mode               use `--mode {AK|StsToken|RamRoleArn|EcsRamRole|RsaKeyPair|RamRoleArnWithRoleName}` to assign authenticate mode
  --profile,-p         use `--profile <profileName>` to select profile
  --language           use `--language [en|zh]` to assign language
  --region             use `--region <regionId>` to assign region
  --config-path        use `--config-path` to specify the configuration file path
  --access-key-id      use `--access-key-id <AccessKeyId>` to assign AccessKeyId, required in AK/StsToken/RamRoleArn mode
  --access-key-secret  use `--access-key-secret <AccessKeySecret>` to assign AccessKeySecret
  --sts-token          use `--sts-token <StsToken>` to assign StsToken
  --ram-role-name      use `--ram-role-name <RamRoleName>` to assign RamRoleName
  --ram-role-arn       use `--ram-role-arn <RamRoleArn>` to assign RamRoleArn
  --role-session-name  use `--role-session-name <RoleSessionName>` to assign RoleSessionName
  --private-key        use `--private-key <PrivateKey>` to assign RSA PrivateKey
  --key-pair-name      use `--key-pair-name <KeyPairName>` to assign KeyPairName
  --read-timeout       use `--read-timeout <seconds>` to set I/O timeout(seconds)
  --connect-timeout    use `--connect-timeout <seconds>` to set connect timeout(seconds)
  --retry-count        use `--retry-count <count>` to set retry count
  --skip-secure-verify use `--skip-secure-verify` to skip https certification validate [Not recommended]
  --expired-seconds    use `--expired-seconds <seconds>` to specify expiration time
  --secure             use `--secure` to force https
  --force              use `--force` to skip api and parameters check
  --endpoint           use `--endpoint <endpoint>` to assign endpoint
  --version            use `--version <YYYY-MM-DD>` to assign product api version
  --header             use `--header X-foo=bar` to add custom HTTP header, repeatable
  --body               use `--body $(cat foo.json)` to assign http body in RESTful call
  --pager              use `--pager` to merge pages for pageable APIs
  --output,-o          use `--output cols=Field1,Field2 [rows=jmesPath]` to print output as table
  --waiter             use `--waiter expr=<jmesPath> to=<value>` to pull api until result equal to expected value
  --dryrun             add `--dryrun` to validate and print request without running.
  --quiet,-q           add `--quiet` to hide normal output
  --help               print help

Sample:
  aliyun ecs DescribeRegions

Use `aliyun --help` for more information.
RAMユーザーの発行
CLIのインストールが完了したので、次にアクセスするためのアクセスIDとシークレットを取得します。
Alibaba Cloudでは、ユーザーやグループを管理するResource Access Management (RAM)という機能があります。
この機能を利用して、新しくRAM User を発行します。
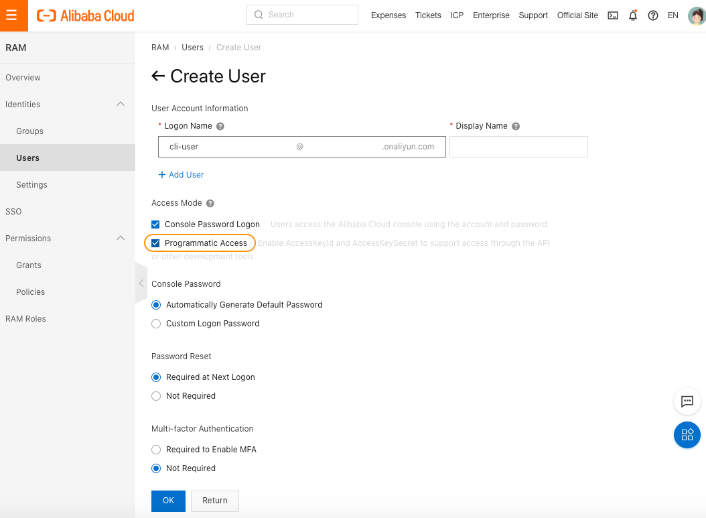
RAM > Identity > Users の画面で、 Create User を選択してユーザーを作成することができます。
CLIで利用するユーザーの作成時には、Programmatic Access にチェックを入れて作成します。
作成後に一度だけ表示されるアクセスIDとシークレットを必ず控えておいてください。
CLIのConfigureを実行
ターミナルに戻って、configure処理を実行します。
aliyun configureコマンドを実行して、対話型モードの質問に回答する形で順番に設定していきます。
アクセスIDとシークレットは、RAMユーザーの発行にて発行されたものを利用します。また、リージョンIDに
ついては、利用するデフォルトのリージョンを設定してください。
$ aliyun configure
Configuring profile 'default' in 'AK' authenticate mode...
Access Key Id []: your-key-id
Access Key Secret []: your-key-secret
Default Region Id []: cn-hangzhou
Default Output Format [json]: json (Only support json)
Default Language [zh|en] en:
Saving profile[default] ...Done.

Configure Done!!!
登録が成功すると、Alibaba Cloudのロゴのアスキーアートが表示されます。
これでAliyun CLIが利用できるようになりました。
設定情報は、 ~/.aliyun/config.json に保存されています。
(AWSとも似ているのであまり悩まないで良いですね)
CLIコマンドの実行
グループ一覧を早速実行してみると、良い感じで取得できますね。AWS CLIとも操作感がにているので
あまり難なく利用できそうです。
$ aliyun ram ListGroups
{
  "Groups": {
    "Group": [
      {
        "Comments": "Administrators Group",
        "CreateDate": "2020-08-10T01:23:00Z",
        "GroupName": "AdminGroup",
        "UpdateDate": "2020-08-10T01:23:00Z"
      }
    ]
  },
  "IsTruncated": false,
  "RequestId": "12345678-ABCD-EFGH-IJKL-123456789012"
}